
Plant Room Project
No room for a water cylinder in your house? Sound familiar?
We have a 1930’s semi detached house, massively remodelled internally over the years. Airing cupboard gone, water cylinder stripped out many years ago and both heating and direct hot water satisfied by a Combi Boiler.
Sound familiar?
Up and down the country this will be a common occurrence, including my home.
Why do you need a water cylinder?
So when you start investigating replacing a combi boiler with a heat pump, one of the first gotchas is that you need a water cylinder for your hot water.
This is because a heat pump doesn’t produce hot water on demand like a boiler does, it heats the water in a tank ready for use later.
Okay then, so where do you put this water cylinder?
- Take back some bedroom space?
- Could it fit in the bathroom?
- Could you repurpose that airing cupboard space back to its original function?
- Do you have space in the loft?
As a family we wrangled with all these options. But we eventually came to the conclusion that because our loft has already been converted to a bedroom, there is zero other space within the house to fit a cylinder.
I’d seen solutions from Europe pop up on my twitter feed showing all-in-one outdoor units housing both a water cylinder and air source heat pump.
These photos are from a company called Factory Zero (https://twitter.com/factoryzeronl) installed in a retrofit project in Essex.


Unfortunately these wouldn’t work for us right now as we weren’t looking to install a heat pump just yet. They did provide a spark of inspiration though.
We eventually want to replace the combi boiler for heating, but we decided to take the first step of getting a water cylinder back in play.
Installing a water cylinder serves a number of purposes for us.
- Frees us from using gas for heating hot water.
- Ticks a prerequisite for getting a heat pump later down the line.
- Gives us somewhere else to dump out excess solar PV generation. Something I recommend on my Solar Generation History article: https://staging.energy-stats.uk/solar-generation-history/
You can also read about my Low Temperature Heating journey and getting ‘heat pump ready’ on my Low Temp Heating blog article.
Thinking outside the box
Or we might be better calling it thinking ‘inside a box’.
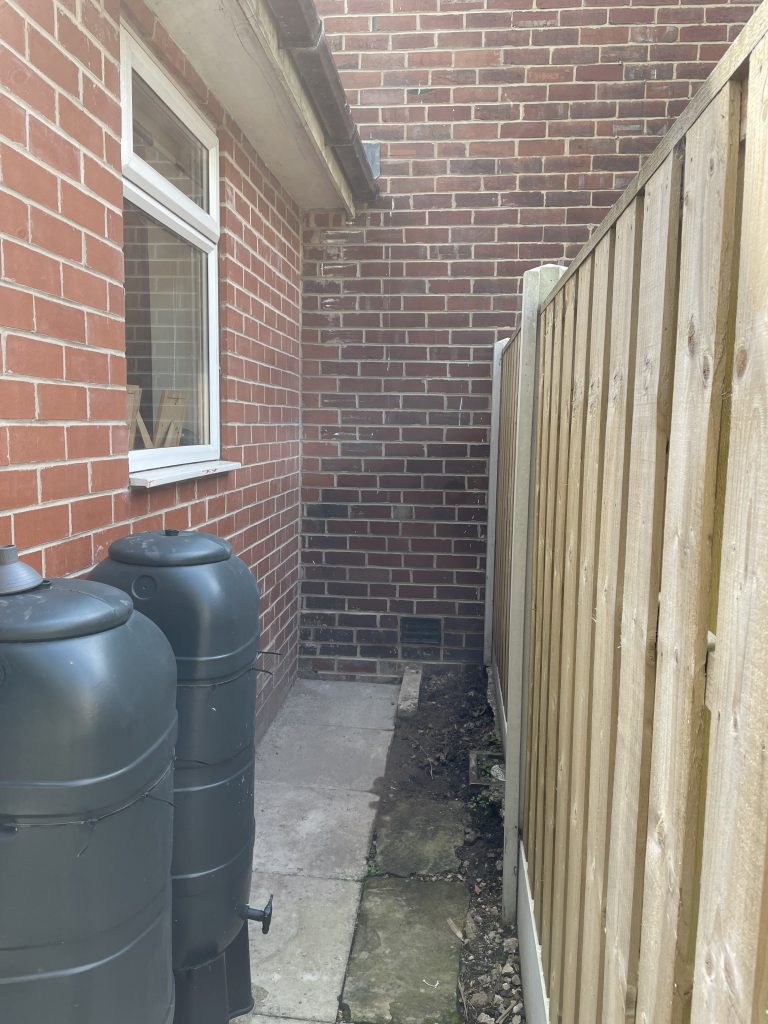
The only viable space I could think of is a sheltered space at the side of our dining room extension. But that would mean building some sort of external box, similar to the dutch heat pump/cylinder box.
This space is on the north side of the house and close to where a heat pump could be sited, so from that point of view, it was the very best spot.
This is how it looked before we began.
But it is outside I hear you cry?
Indeed it is, but when I spoke to my heating engineer. He said that as long as you make the box waterproof, how is this any different to putting a water tank in an uninsulated loft?
So the plan was hatched. Build a plant room box in the space.
Preliminary design points
- It will be water tight and insulated.
- Space wise we’ve got around 1m width and around 1.2m deep to play with.
- And we can go up to around 2.2m metres high
- Yes, it will be tight to get the cylinder and associate pipework in there, but doable.
- It will have a large door on the front for installation and servicing purposes.
Which Water Cylinder
Before building the box I needed to decide on the hot water technology I wanted to use. As this would provide sizing’s for me to create the design around.
I started off with three trains of thought:
- Dumb water cylinder
- Smart water cylinder
- Heat battery
I quickly eliminated the dumb water cylinder. It just didn’t jive with me. I want facts, figures, graphs etc.
So if I went water cylinder the obvious choice would be Mixergy and if I went heat battery then it had to be a Sunamp.
In the end, I decided to go with the Mixergy tank.
Why Mixergy?
- Internet connected
- Time of use tariffs
- Solar PV diversion module
- Machine learning of usage
- Optimised heating
- Heat pump ready (just add heating plate)
- Visible state of charge (ie 60% full)
- API controls
- Phone App
- I wasn’t particularly constrained for space (otherwise the Sunamp would probably have won)
All in all, it just ticked all the geeky boxes that I wanted.
For the Solar PV diversion part of the system I went with the myenergi Eddi device.
This was a no-brainer as I already have the myenergi Zappi EV charger, so they’d work together perfectly and I already have all the CT clamps and hub in place from the Zappi.
This should make the Eddi a pretty straightforward install.

Even though we will still have the Combi boiler in play for heating for a while, we decided we wouldn’t hook it up for the water cylinder.
With our intention to eventually strip out the combi and go heat pump, it made no sense to hook the new water cylinder into it.
So we will be initially heating the water solely on electricity. Be that from the grid, from my batteries or from solar diversion.
What size water cylinder
Well the ‘rule of thumb’ for sizing a water cylinder is somewhere around 40 to 45 litres of water per day per person. There are 4 of us, so that puts us somewhere in the 160 to 180 litre range.
Mixergy have the following size options available in their standard 580mm wide range.
- 120L
- 150L
- 180L
- 210L
- 250L
- 300L
They also have a slimline range (478mm wide)
- 120L
- 150L
- 180L
- 210L
But these slimline models are obviously a lot taller because they are narrower.
The usual hot water sizing rule of thumb suggested the 180L would be good for us.
But because of Time of Use tariffs and also our Solar PV, I want to use the hot water cylinder as a battery. Ie, when I have ‘free’ energy from PV or ‘cheap’ energy from the grid I want somewhere to dump it for later use.
For example, on Agile tariff plunges or very cheap periods, we could heat the tank and store that energy. So make use of cheap/free electricity.
Similarly, during the spring, summer and autumn there are days that we generate so much energy via our Solar PV that our battery setup is full by lunchtime and we could have 10kWh spare capacity in the afternoon. Better to put that into the water cylinder than back to the grid.
Because I’m limited in height in the plant room box of around 2m, then the 250L Mixergy is the biggest I could fit in there.
The height of the 250L is 1831mm which I’d planned would just fit through the door and stand with some space above inside the box.
Bottom line, if I could have got a 300L tank in there, I would have done it.
Building a box
Am I very lucky to have had a great builder helping me with the plant room box project.
Mike Haver from Practical Property Services here in Sheffield.
https://www.practicalpropertyservices.co.uk/

He has already helped me with some insulation work in the house to remediate problems highlighted via the FLIR camera loan.
You can see some of that via https://staging.energy-stats.uk/flir-thermal-camera/
Initial Drawings and Plans
Will all of the water cylinder, electrics and extra gubbins fit in the space we have?
I’m just an IT geek, so my initial drawings were rudimentary at best.


I also created some scale drawings to ensure the water cylinder fitted okay in the space too.

And finally I came up with a plan of how I thought the electrics would hopefully look.

Reduce, Reuse, Recycle
Being a builder with a shed/workshop, Mike had lots of odds and ends from previous work projects and his own home upgrades.
I also had a few bits and pieces knocking around from previous insulation work in the house.
So in the spirit of all things renewable here’s what we managed to reuse and not have to buy.
- 4 x 2 timber for the frame
- A pallet that we used for the box flooring
- Roof cedar shingles
- Larch cladding for front/sides
- PIR Insulation
- Airtight insulation tape
- POE Network Switch and patch cables
- Roofing Lead
- Padlock
- Plug sockets
- Light Switch
- Bulk head light
Bits we did have to buy
- Mixergy Tank
- IMI Aquapresso expansion vessel
- Eddi PV Diverter
- Consumer Unit and associated electrics
- OpenEnergyMonitor emonTX monitoring
- 15m ethernet cabling
- 15m twin and earth
- POE Camera
- Cable ducting
- Pre-insulated 25mm Maincor MLCP water pipes
- PIR Insulation (2 x 25mm sheets)
- Hasp and staple lock
- 5 Lever Lock
- Guttering
- Plywood
Water and plumbing work
All plumbing work was be undertaken by Damon Blakemore of Blakemore Plumbing and Heating.
Again, based here in Sheffield.
https://blakemoreplumbingandheating.co.uk/
Along with Mike, Damon has been integral to making this project happen.
I couldn’t have done this without their help.

One of the main problems with the plans were that the new plant room is totally on the other side of the house to where the combi boiler and existing hot/cold water feeds are.
So the only option open to us would be to run a connection back there under the subfloor of the house. For this we had to use 25mm pre-insulated MLCP (multi layer composite pipe) from Maincor.
This comes on big reels so that you can run long lengths with no need to make joins etc and it is pre-insulated.
The run from Combi to the Plant Room under the floor is about 15m, so one pipe required for hotwater and another for cold.
We pre-ran this under the sub floor well ahead of time.
On installation day we’d then disconnect hot and cold water from the combi boiler and plumb in the new water cylinder instead.

The Build
As the box was going to contain a 250L tank of water weighing around 300KG when full we had to put a decent base in place. Luckily we had a good starting point with some paving slabs that were concreted in 20 years ago. We fixed some concrete building blocks on top provide a secure and level platform.
We left some gaps on the left for pipe runs coming in, both and now and in the future. ie heat pump primaries to come in at the front bottom left.
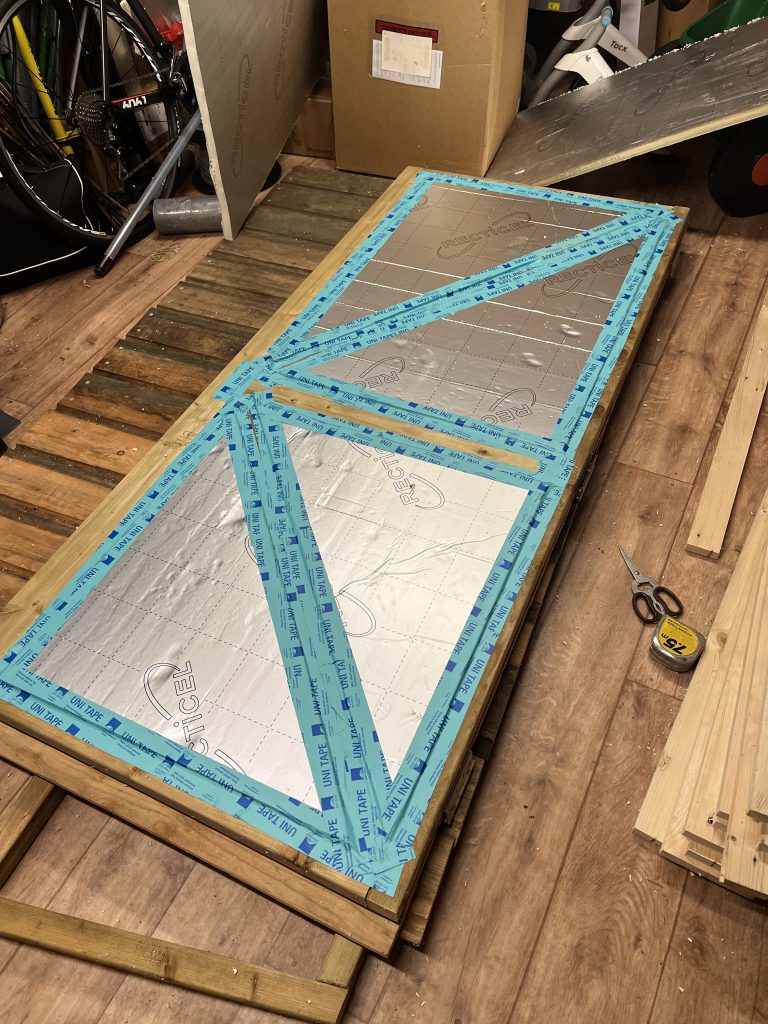
The wooden frame was then screwed to the wall to secure in place and the gaps between filled with 100mm of PIR. This was the first of much insulation that I had planned.
We also knocked a brick out into the dining room sub-floor to allow the pipes and cables to come through.

Beavering away in his workshop, Mike created the door and frame of the box and covered them in larch cladding.
When Mike brought me over the door I set about cutting the PIR to size to ensure the front door provided some protection from the elements.
I also went to town on the air tightness tape.
On reflection maybe too much as that Pro Clima Uni Tape is not cheap. oops.
Next, Mike brought the two main sides over and he screwed those into place along with the frame for the roof.


Once the plywood for the roof was in place, it was covered in felt.
I was then able to insulate and tape the whole of the inside of the box to try and make it as airtight as possible.
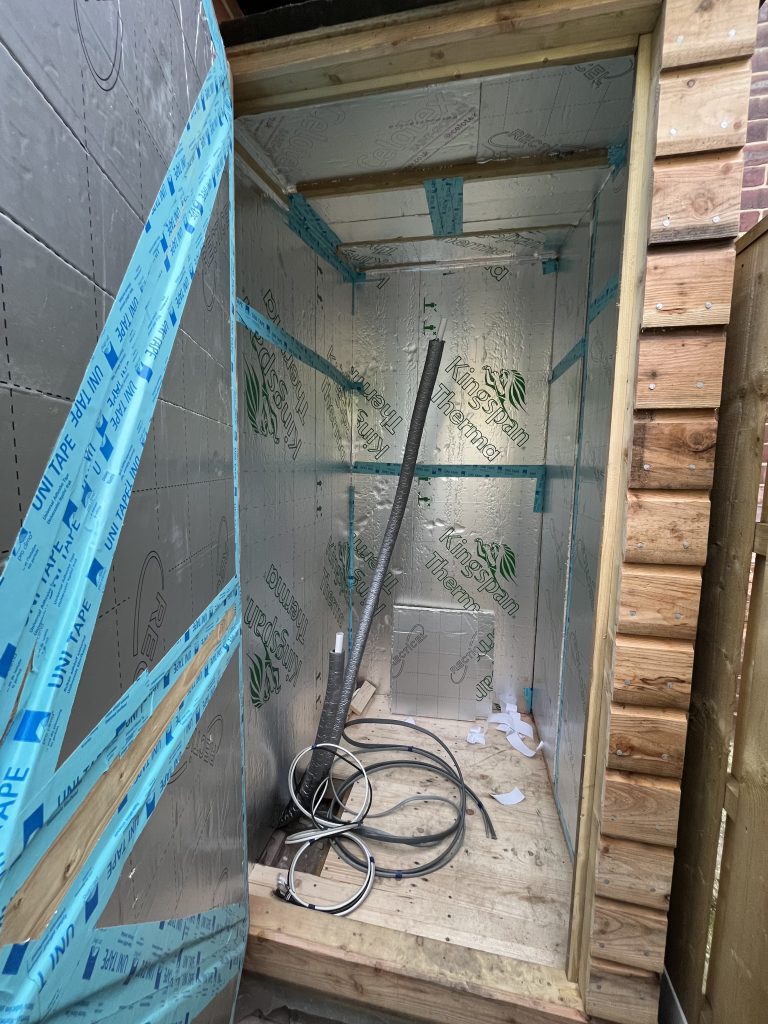
Now that we were water tight we were able to lay and bring the MLCP water pipes, the twin and earth electrical cable and the ethernet networking into the box.
Linking one side of the house to the other.
Insulation Summary
In the end I used up quite a bit of PIR sheeting and air tightness tape to try and help the structure retain heat.
- Front Door – 50mm PIR
- Left Wall – 25mm PIR (in contact with house)
- Back Wall – 25mm PIR (in contact with house)
- Floor – 100mm PIR
- Right side – 50mm PIR
- Roof – 50mm PIR
This box could well be better insulated than much of the UK housing stock?
So how did the insulation fare?
Well here’s a screen grab of the temperature probe monitoring I’d put in place with no water cylinder in the plant room box.
As you can see, on the 6th of January 2022 the outside temperature dropped below -1C yet inside the box stayed almost 7C.
This pattern and difference between inside and outside showed itself to be consistent across a number of weeks of monitoring.
So I was happy how the insulation was performing ahead of installing the tank.
The Electrics
So electric wise the first job was to link the plant room up with the rest of the house.
We fitted a new small consumer unit in the plant room box with separate RCBO for the main connections; Mixergy, Eddi, Lights etc.
We also ran a second twin and earth cable from house consumer unit into the plant room for connecting up the heat pump directly in the future. This was so we didn’t need a whopping single twin and earth cable to cater for all the load between the two locations.
We will have a RCBO for the heat pump connection back in the main house consumer unit rather than here in the small consumer unit.
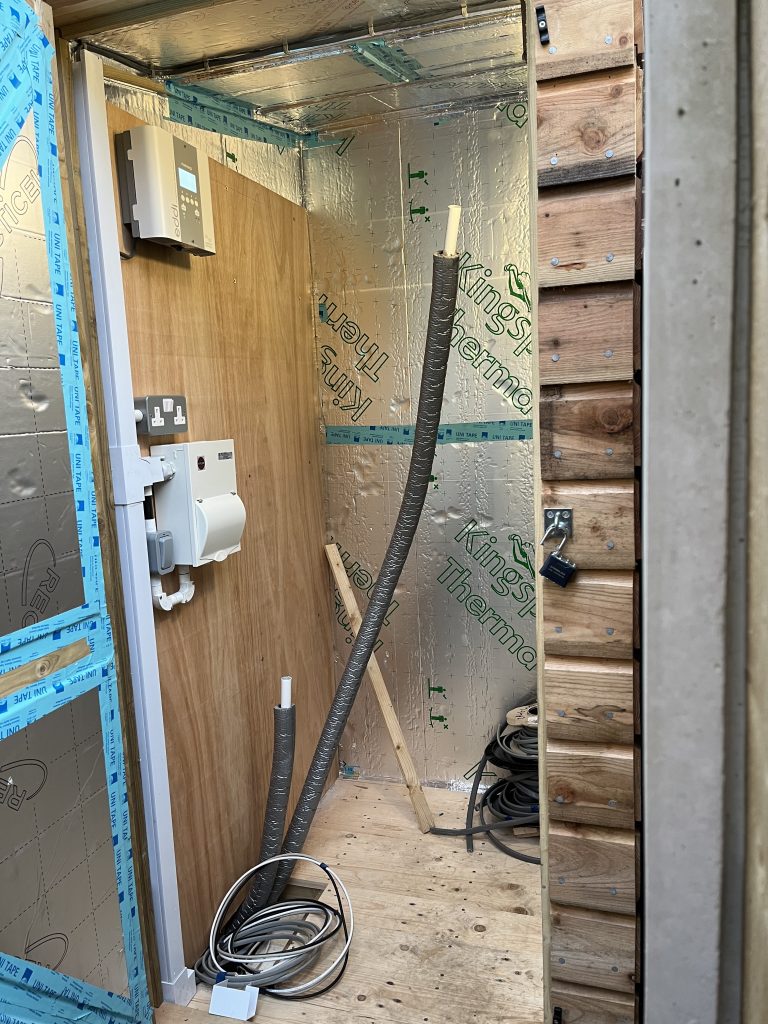
Once the electrics were in we set about installing the following
- Myenergi Eddi (for PV Diversion)
- Open Energy Monitor emonTX (for monitoring CT clamps and temperature probes)
- POE Network Switch (so that the plant room extended into my home network)

Finish off the roof
Mike had a bunch of cedar shingles left over from a job, so he came and made a gorgeous roof covering out of those that went on top of the original felt he laid.
Belt and braces there perhaps, but it looks beautiful to me now.

The plan is also to finish the roof off with lead work. That’s on the finish up to-do list.

I also purchased a ‘shed’ guttering kit and fitted that as well as a Reolink 520 POE camera for security.
This camera connects straight into the network switch in the box and adds to the other Reolink POE cameras I’ve got around the house. All accessible from the Reolink phone app.

The tank arrives
Fair play to Mixergy. They sent their own delivery driver to drop the tank off and Ryan, bless him, helped me manhandle the tank into the shed.


Installation Day
To be honest, because of the amount of prep work Mike, Damon and I had done, the installation went very well.
Damon did a grand job, disconnecting the combi in the morning and getting the Mixergy up and running later the same day.

Granted, it was a little tight working in there, but he got there in the end.
As part of Damon’s association with Expert Trades, Harrison Mudge had come along to video the installation for Mixergy.
You can see the video he put together on the Expert Trades Facebook page (no sign in required).
I really love the drone shot they took of our house showing all our solar panels facing different directions.
One Month on – Almost Finished


I’ve still got a few little jobs left on the to-do list. But 95% is in there working now.
Temperature inside the box
So the temperatures inside the box are looking great with the tank now in there and working.
Ambient ‘doing nothing’ temperature is over 10C higher than outside.
There is a small temp increase overnight when charging the tank, but the real increase comes through the day, which must be heat from the full tank gradually releasing into the box.
And because of the insulation, this heat is retained in the box.

myenergi Eddi
This is working brilliantly. Once my batteries are full, any excess Solar PV is directed to the immersion in the tank.
You need to have the Mixergy PV Diverter switch attached to the tank (and the Eddi).
This just acts as a switching box between either the Mixergy wanting to heat the immersion of the Eddi taking control.
With only the single immersion, only one device can control the heating of it at any one time.

Because we already own the Zappi EV charger, this makes for an awesome, all in one app combo for PV diversion.
I can even switch priorities on the fly between the Zappi and the Eddi if I want to send excess solar to one or the other.

Overnight Charging
We have been charging the Mixergy back to 100% every night using Octopus Energy Go Faster tariff, currently 5.5p per unit.
But this is SLOW. Having never owned an immersion as a homeowner before, it has been a bit of a shock to be honest, despite doing lots of research.
To heat 200L from 8 degrees to 65 C, it takes about 4hrs 15 mins and uses 12.8kW of electricity.
By design, the immersion in the Mixergy tank is only a single 3kW unit.
This is fine for connection to the Eddi and trickle charging, but if your sole heating method is the 3kW immersion then this could cause you issues, especially if you are a big family and you have chosen a smaller tank. You just can’t recharge the tank quickly enough from the immersion after a bunch of showers for example.
We are using on average around 200L per day. Which puts pressure on the 250L, especially with not having the luxury of re-heating water quickly. There is always that fear in your mind that you’re gonna run out of hot water as you approach 20% left. A bit like range anxiety in an EV.
I’m really glad we didn’t take the 40-45L per person advice at face value and get the smaller tank.
The recharge times back to 70% full on a gas boiler or a heat pump can be as little as 10-20 minutes, which would be great. But the immersion would take 3 and a half hours in winter (10C to 65C) to get back to 70% of this 250L tank.
Even 10% (25L) for very quick shower is going to take 30 mins to warmup via immersion.
I personally think Mixergy have missed a trick by not putting (or offering) a dual immersion set up on their direct only tanks. Although I imagine this is so they can run the tank on the 16A breaker and the new tank be a like for like replacement for an old single immersion tank.
If you plan to have a water cylinder, not just a Mixergy, that is solely heated by a single 3kW immersion then my advice would be go as big a size cylinder as you possibly can to avoid the worry brought on by 4 showers in a row.
Especially if you plan to load up on low carbon / cheaper / off-peak overnight electricity.
Here are reheat times for a variety of Mixergy tank sizes and either direct (immersion), indirect (gas) or heat pump times.
Note: The complaint about the slow reheat times is NOT a Mixergy only fault.
ANY water cylinder with a single 3kW immersion will take hours to charge up.
It’s physics. There is only so much energy a 3kW kettle element (that’s what an immersion is) can produce.
You can use this online calculator to see for yourself and put in your own cylinder and immersion size: https://bloglocation.com/art/water-heating-calculator-for-time-energy-power
As we hope to move to a heat pump in the future, these recharge times issues should only be a minor inconvenience in the mean time. And if you’re buying a Mixergy (or any cylinder) to work with a heat pump, you’ll likely be okay with a smaller one because of the faster recharge times.
Only final pain in the bum to me of the Mixergy is that you can only heat the water to 65C.
It would appear that with almost every other water cylinder out there you can heat water hotter than 65C.
Being able to heat hotter on the Mixergy would really help with the “range anxiety” mentioned above. As you’d be blending down to a usable 45C for example at the taps, so using less hot water.
So this seems a big miss for me and it would really help if you’re heating the tank solely on immersion overnight. Not sure if there are any technical reasons why you can’t put the Mixergy past 65C?
Note: Damon fitted me blending valves so that our taps come out at around 45C, so no scald risk with the kids.
Energy Usage / Gas Reduction
As we come towards the end of our first month of Mixergy use, February 2022, we’ve so far used 277kWh of electricity to heat the tank.
That equals around 11kWh average per day.
As the vast majority of that was done overnight using Octopus Go Faster at 5.5p per unit, that’s just over £15 this month.
Our gas tariff is currently 3.76p per unit, fixed until May 2022. Upon renewal this might end up being somewhere near 10p per unit.
To this point in the month we have also sent 63kWh of Solar PV via the Eddi. So free sunshine heating the water.
As we head into spring and summer with more sunshine we’d hope to do less importing overnight and heating more via the power of the sun and/or from energy stored in the batteries.
But one month in, that’s one month of not burning gas to heat water, so that’s a really good thing.
I used to estimate that we’d use around average 14kWh of Gas per day for hot water. Although it was always hard to know exactly with a combi supplying heat too as well as cooking on Gas.
I also don’t see this as straight Gas versus Electricity battle.
I like to think that because that vast majority of the electricity is from either Go Faster overnight, stored in our batteries or from solar, then this is all as low carbon electricity as I can muster.
When we go air source heat pump, I’d like to think we’ll use much less electricity for heating hot water.
Because right now the electricity used via immersion is 1:1.
1 unit of electricity in for 1 unit of heat out. It’s not very efficient. As as explained above, it’s very slow too, taking hours because of the small surface area of the immersion element.
On ASHP the heating times are much shorter because of the larger surface area and also for every unit of electricity you put in, we’ll get multiple units out.
So this is another good reason to move over to ASHP as apposed to heating via immersion.
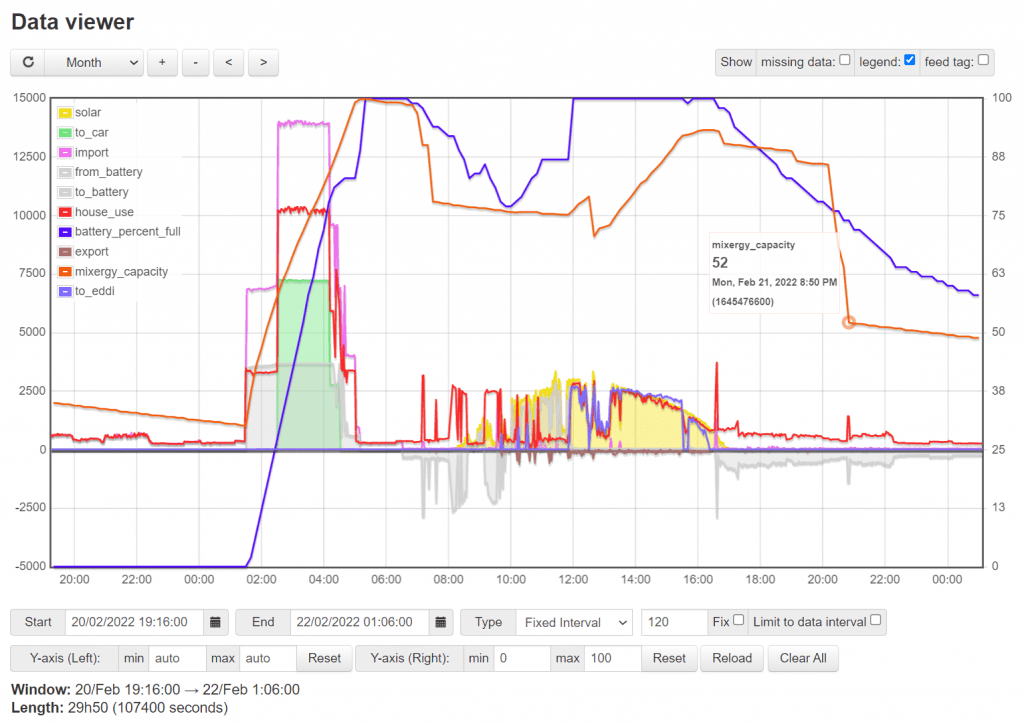
How’s it look through a day
From OpenEnergyMonitor emoncms, here’s a day view of importing to the tank, the EV and the batteries overnight on Go Faster.
We get through breakfast on batteries before solar kicks in.
Batteries and Mixergy take advantage of the sunshine and charge up.
And this is a sunny day in February. Things should look even better once we head into spring and summer.
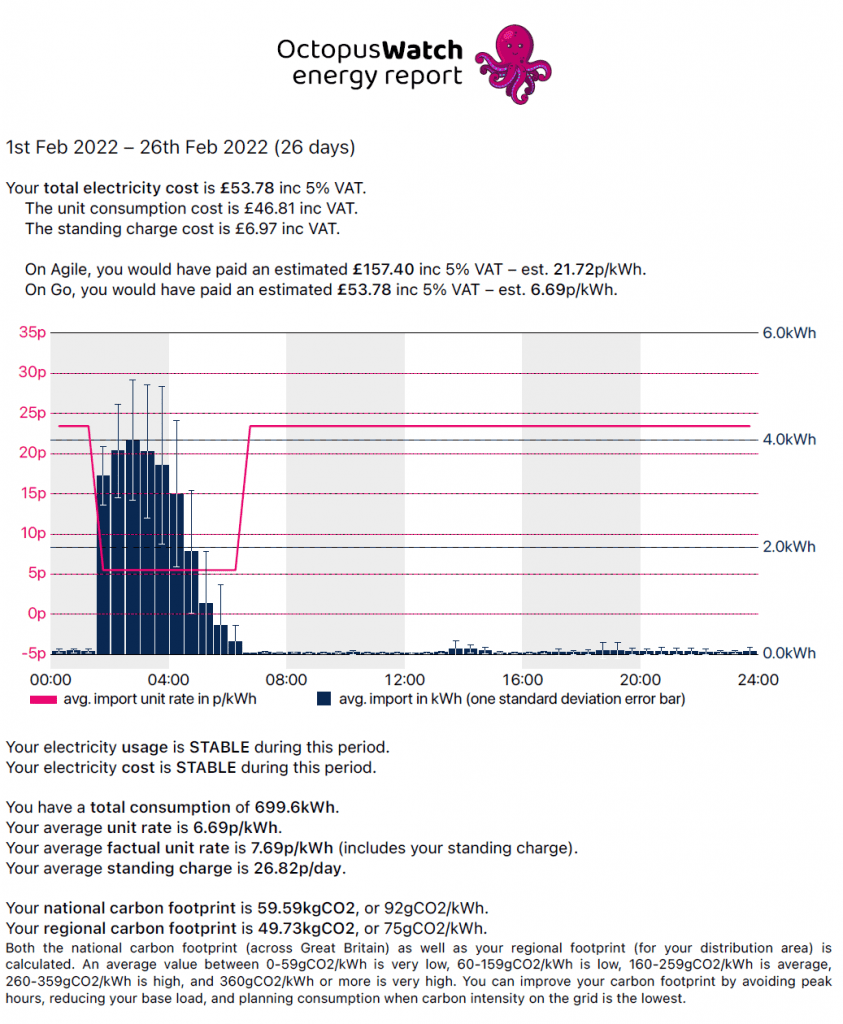
A finally, here’s a chart from Smarthound Octopus Watch app showing how we have been able to shift the majority of our household consumption to off-peak using Go Faster.
Using a combination of EV, batteries, Mixergy cylinder and solar PV.
The most pleasing stat there being the our carbon footprint being classed as “very low”.
Mixergy App and Scheduling
The app is good. Lots of choice around setting schedules. I currently have two schedules
- 01:30 – charge to 100% (via Go Faster)
- 14:00 – charge back to 80% (so got enough for plenty of showers in the evening)
The 2pm schedule is just in case there hasn’t been any solar diversion through the day. So this will come out of batteries or import from the grid.
Family would go mad if no hot water when coming home from work and school.
You can also add simple rules like ‘maintain to 30%’. So even if there is no timed heating planned, if the tank goes below 30% it will auto top it back to 30%.

There are also a bunch of reports you can display in the app (and via mixergy.co.uk)


This screen grab below shows the Mixergy website screens.

So if you like your graphs and stats, then you wont be disappointed here.
There is also a section on the app where you can configure Octopus Energy time of use tariffs and enter your tariff pricing information.
The pricing can then be used to give summary of costs in the various reports.

Mixergy API and Home Assistant
One of the main reasons why I was drawn to the Mixergy was it having an API.
Having an API can mean easy integration with self written code or open source packages like Home Assistant.
With the API, for starters you can point to https://www.mixergy.io/api/v2/account
Mixergy technical support sent me a copy of the API instructions and endpoints, but I can’t seem to see this document listed on their website. Which is a bit strange. Maybe you do just have to ask?
One person that did ask and has done some tremendous work is Tomas Mcguinness with his awesome Home Assistant integration.
https://github.com/tomasmcguinness/homeassistant-mixergy
As soon as you get this working you’ll have tank full readings, top/cold water temps and a whole other bunch of metrics from the tank.
Here I added them to my Home Assistant dashboard.

There is definitely more scope to automate tank charging based on ‘things’.
I’d love to write something or use something that integrated with Solcast Solar Forecasting so I could make overnight target charging decisions based on tomorrows solar forecast.
I talk about solar forecasting on my article: https://staging.energy-stats.uk/solcast-forecasting/
Or maybe this is the sort of integration that Mixergy to add into their setup. Now that would be a cool baked in addition, solar forecasting.
Closing Summary
This has been an epic project.
I have learned a lot along the way about a whole manner of topics.
I can’t thank Mike and Damon enough for their help throughout. I really could not have done this without them.
So having proved comfort in our house running at 40 degree flow throughout the winter and now the installation of a water cylinder, I think we are almost “heat pump ready”.
Let’s see what the forthcoming Boiler Upgrade Scheme brings.
Any questions or comments about any of the blog article please do let me know via the contact form.
If you find this information useful and are thinking of joining Octopus Energy, please consider using my referral code or ‘buy me a coffee’ to help support running costs of the website.
Using this referral code will gift you £50 of free credit after signup: https://share.octopus.energy/linen-pearl-869
If you’re considering owning part of a wind farm through Ripple Energy, get £25 of free credit (if investing more than £1000) using my Ripple referral link.
We can also be found on Twitter, please follow us @energystatsuk for daily Agile tariff pricing graphs and summaries.
Also, be sure to check out our Dashboard, Download Historical Data and OctoChargeCalc features to help you decide whether these tariffs are the right fit for you.
Note: The past performance of energy pricing is not necessarily a guide to the future.